"Scripts/MonoBehaviours" 폴더에 "CameraSingleton.cs"이라는 이름의 새 C# 스크립트 파일을 만들고 다음 내용을 저장합니다:
// 메인 카메라에 접근하는 방법은 여러 가지가 있지만,
// 싱글톤(여기서 사용하는 방식)을 사용하는 접근 방식은 모든 종류의 MonoBehaviour에서 작동됩니다.
class CameraSingleton : UnityEngine.MonoBehaviour
{
    public static UnityEngine.Camera Instance;

    void Awake()
    {
        Instance = GetComponent<UnityEngine.Camera>();
    }
}
"SampleScene"의 "Main Camera" 게임 오브젝트에 "CameraSingleton" MonoBehavior를 추가합니다.
"Scripts/Systems" 폴더에 "CameraSystem.cs"이라는 이름의 새 C# 스크립트 파일을 만들고 다음 내용을 저장합니다:
using Unity.Collections;
using Unity.Entities;
using Unity.Mathematics;
using Unity.Transforms;

// 이 시스템은 변환 시스템이 업데이트된 후 실행되어야 합니다.
// 그렇지 않으면 카메라가 탱크보다 한 프레임 뒤로 처져 흔들림이 발생합니다.
[UpdateInGroup(typeof(LateSimulationSystemGroup))]
partial class CameraSystem : SystemBase
{
    Entity Target;
    Random Random;
    EntityQuery TanksQuery;

    protected override void OnCreate()
    {
        Random = Random.CreateFromIndex(1234);
        TanksQuery = GetEntityQuery(typeof(Tank));
        RequireForUpdate(TanksQuery);
    }

    protected override void OnUpdate()
    {
        if (Target == Entity.Null || UnityEngine.Input.GetKeyDown(UnityEngine.KeyCode.Space))
        {
            var tanks = TanksQuery.ToEntityArray(Allocator.Temp);
            Target = tanks[Random.NextInt(tanks.Length)];
        }

        var cameraTransform = CameraSingleton.Instance.transform;
        var tankTransform = GetComponent<LocalToWorld>(Target);
        cameraTransform.position = tankTransform.Position - 10.0f * tankTransform.Forward + new float3(0.0f, 5.0f, 0.0f);
        cameraTransform.LookAt(tankTransform.Position, new float3(0.0f, 1.0f, 0.0f));
    }
}
플레이 모드로 들어가서 게임 뷰(이전과 같이 씬 뷰가 아님)를 보면 카메라가 탱크 중 하나를 따라가고 있음을 확인할 수 있습니다.게임 뷰에 입력 포커스가 되어 있는지 확인하고(클릭해서) 스페이스바를 반복적으로 누릅니다. 카메라는 그 때마다 매번 다른 임의의 탱크로 전환되어야 합니다.
"Scripts/Components" 폴더에 "Shooting.cs"이라는 이름의 새 C# 스크립트 파일을 만들고 다음 내용을 저장합니다:
using Unity.Entities;

// 이 태그 컴퍼넌트는 "사용 가능한 컴퍼넌트"이기도 합니다.
// 이러한 컴퍼넌트들은 엔티티에 존재하는 동안 온/오프 될 수 있습니다.
// 이렇게 하는 것이 컴퍼넌트를 추가하거나 제거하는 것보다 훨씬 효율적입니다.
struct Shooting : IComponentData, IEnableableComponent
{
}
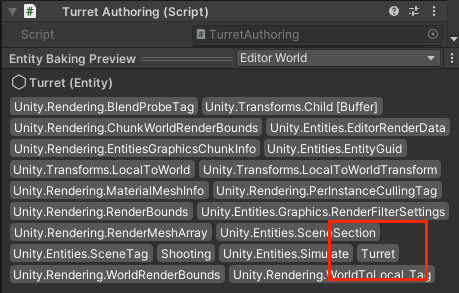
"Scripts/Authoring" 폴더에 있는 "TurretAuthoring.cs" 파일의 내용을 다음과 같이 수정합니다:
 using Unity.Entities;

 class TurretAuthoring : UnityEngine.MonoBehaviour
 {
     public UnityEngine.GameObject CannonBallPrefab;
     public UnityEngine.Transform CannonBallSpawn;
 }

 class TurretBaker : Baker<TurretAuthoring>
 {
     public override void Bake(TurretAuthoring authoring)
     {
         AddComponent(new Turret
         {
             CannonBallPrefab = GetEntity(authoring.CannonBallPrefab),
             CannonBallSpawn = GetEntity(authoring.CannonBallSpawn)
         });

+        // 활성화된 컴퍼넌트들은 항상 초기에 활성화됩니다.
+        AddComponent<Shooting>();
     }
 }
"Scripts/Systems" 폴더에 "SafeZoneSystem.cs"이라는 이름의 새 C# 스크립트 파일을 만들고 다음 내용을 저장합니다.
using Unity.Burst;
using Unity.Collections;
using Unity.Entities;
using Unity.Mathematics;
using Unity.Transforms;

// Turret type을 처리없이 사용해야 합니다(Execute 메서드에 포함되지 않음).
[WithAll(typeof(Turret))]
[BurstCompile]
partial struct SafeZoneJob : IJobEntity
{
    // 이 작업을 병렬로 실행할 경우, 서로 다른 스레드에서 동일한 엔티티에 액세스하면 문제가 발생하여
    // 세이프티 시스템에서 TurretActiveFromEntity와의 잠재적인 경합 상태에 대해 항의합니다.
    // 그러나 이 작업의 코드는 현재 처리 중인 엔티티만 TurretActiveFromEntity에서 조회되도록 작성되어
    // 이 프로세스를 안전하게 만듭니다.
    // 그래서 우리는 병렬 세이프티 체크를 비활성화할 수 있습니다.
    [NativeDisableParallelForRestriction] public ComponentLookup<Shooting> TurretActiveFromEntity;

    public float SquaredRadius;

    void Execute(Entity entity, TransformAspect transform)
    {
        // 슈팅 태그 컴퍼넌트는 탱크가 지정된 범위를 벗어나는 경우에만 활성화됩니다.
        TurretActiveFromEntity.SetComponentEnabled(entity, math.lengthsq(transform.Position) > SquaredRadius);
    }
}

[BurstCompile]
partial struct SafeZoneSystem : ISystem
{
    // ComponentLookup 랜덤 접근자는 즉석에서 생성해서는 안 됩니다.
    // EntityQuery처럼, 한 번 만들고 필드에 저장해야 합니다.
    ComponentLookup<Shooting> m_TurretActiveFromEntity;

    [BurstCompile]
    public void OnCreate(ref SystemState state)
    {
        state.RequireForUpdate<Config>();

        m_TurretActiveFromEntity = state.GetComponentLookup<Shooting>();
    }

    [BurstCompile]
    public void OnDestroy(ref SystemState state)
    {
    }

    [BurstCompile]
    public void OnUpdate(ref SystemState state)
    {
        float radius = SystemAPI.GetSingleton<Config>().SafeZoneRadius;
        const float debugRenderStepInDegrees = 20;

        // Debug rendering (the white circle).
        for (float angle = 0; angle < 360; angle += debugRenderStepInDegrees)
        {
            var a = float3.zero;
            var b = float3.zero;
            math.sincos(math.radians(angle), out a.x, out a.z);
            math.sincos(math.radians(angle + debugRenderStepInDegrees), out b.x, out b.z);
            UnityEngine.Debug.DrawLine(a * radius, b * radius);
        }

        m_TurretActiveFromEntity.Update(ref state);
        var safeZoneJob = new SafeZoneJob
        {
            TurretActiveFromEntity = m_TurretActiveFromEntity,
            SquaredRadius = radius * radius
        };
        safeZoneJob.ScheduleParallel();
    }
}
다음과 같이 "Scripts/Systems" 폴더에 있는 "TurretShootingSystem.cs" 파일의 내용을 수정합니다:
+// 슈팅 태그 컴퍼넌트의 요구로 인해 안전 영역에 있는 탱크에 대해 이 작업이 실행되는 것을 사실상 방지합니다.
+[WithAll(typeof(Shooting))]
 [BurstCompile]
 partial struct TurretShoot : IJobEntity
 {
     [ReadOnly] public ComponentLookup<LocalToWorldTransform> LocalToWorldTransformFromEntity;
     public EntityCommandBuffer ECB;

     void Execute(in TurretAspect turret)
     {
         var instance = ECB.Instantiate(turret.CannonBallPrefab);
         var spawnLocalToWorld = LocalToWorldTransformFromEntity[turret.CannonBallSpawn];
         var cannonBallTransform = UniformScaleTransform.FromPosition(spawnLocalToWorld.Value.Position);

         cannonBallTransform.Scale = LocalToWorldTransformFromEntity[turret.CannonBallPrefab].Value.Scale;
         ECB.SetComponent(instance, new LocalToWorldTransform
         {
             Value = cannonBallTransform
         });
         ECB.SetComponent(instance, new CannonBall
         {
             Speed = spawnLocalToWorld.Value.Forward() * 20.0f
         });

         // 아래 라인은 포탑에서 대포알까지 색을 전파합니다.
         ECB.SetComponent(instance, new URPMaterialPropertyBaseColor { Value = turret.Color });
     }
 }
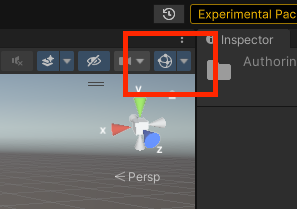
플레이 모드로 들어가면 탱크가 세이프 존 밖으로 나온 후에만 사격합니다. 보기 옵션에서 gizmos가 활성화 되었는지 확인하세요, 그렇지 않으면 흰색 원이 표시되지 않습니다.
여전히 플레이 모드에서, 제작된 "Config" GameObject를 선택하고 "Safe Zone Radius"를 수정합니다. "Live Baking" 덕분에 변경 사항이 실시간으로 반영됩니다.
Step 7 - 색이 입혀진 탱크들과 대포알들(Colored tanks and cannon balls)
고급 베이킹, 베이킹 시스템들에 대해 소개
ECS 컴퍼넌트들은 렌더링에 사용되는 쉐이더들에 대한 입력들을 제어할 수 있습니다. 자체 쉐이더를 만들고(쉐이더 그래프를 통해) 사용자 지정 ECS 컴퍼넌트를 입력에 맵핑하는 것은 이 튜토리얼의 범위를 벗어나지만, URPMaterialPropertyBaseColor라는 기존 컴퍼넌트를 사용할 예정입니니다. 이름에서 알 수 있듯이 표준 URP 머티리얼의 기본 색상을 제어할 수 있습니다.
우리의 탱크는 3개의 원시 요소(탱크, 터렛, 대포)로 구성되어 있으며, 각 엔티티에는 URPMaterialPropertyBaseColorcomponent가 추가되어야 합니다.
그렇게 하려면 Tank 프리팹을 열고 Hierarchy(탱크, 포탑, 대포)에서 SpawnPoint 트랜스폼을 제외하고 세 가지 기본 요소를 모두 선택하합니다. 렌더러가 없기 때문에 색상은 필요하지 않습니다.
세 가지 기본 요소를 선택한 상태에서 인스펙터의 "컴퍼넌트 추가" 단추를 사용하여 URPMaterialPropertyBaseColorAuthoringcomponent를 추가합니다.
플레이 모드로 전환하면 탱크가 완전히 검은색이 됩니다(방금 추가한 컴퍼넌트 요소의 기본값이 0,0,0,0입니다.).
플레이 모드에서 나가세요.
📝 NOTE
아래 시스템에서 사용하는 EntityCommandBuffer에는 SetComponentForLinkedEntityGroup에서 대상으로 지정할 엔티티를 지정하는 쿼리가 필요합니다. 엔티티 쿼리의 핵심은 컴퍼넌트 타입 집합들로 구성되며, 쿼리는 해당 집합과 일치하는 엔티티에 대한 필터링된 보기만 제공합니다. 엔티티 쿼리에 대한 자세한 내용은 package documentation를 참조하세요.
다음과 같이 "Scripts/Systems" 폴더에 있는 "TankSpawningSystem.cs" 파일의 내용을 수정합니다.
 using Unity.Burst;
 using Unity.Collections;
 using Unity.Entities;
 using Unity.Mathematics;
 using Unity.Rendering;

 [BurstCompile]
 partial struct TankSpawningSystem : ISystem
 {
+    // 쿼리는 OnUpdate의 즉석에서 만들어져서는 안 되므로 필드에 캐시됩니다.
+    EntityQuery m_BaseColorQuery;

     [BurstCompile]
     public void OnCreate(ref SystemState state)
     {
+        // Config(구성) 싱글톤이 로드되기 전에는 이 시스템을 실행하면 안 됩니다.
+        state.RequireForUpdate<Config>();

+        m_BaseColorQuery = state.GetEntityQuery(ComponentType.ReadOnly<URPMaterialPropertyBaseColor>());
     }

     [BurstCompile]
     public void OnDestroy(ref SystemState state)
     {
     }

     [BurstCompile]
     public void OnUpdate(ref SystemState state)
     {
         var config = SystemAPI.GetSingleton<Config>();

+        // 이 시스템은 한 번만 실행되므로 랜덤 시드를 하드 코딩할 수 있습니다.
+        // 임의 상수 시드를 사용하면 동작이 결정론적으로 진행됩니다.
+        var random = Random.CreateFromIndex(1234);
+        var hue = random.NextFloat();

+        // 가능한 한 서로 다른 색상을 만듭니다.
+        // 이 접근법의 논리는 다음 주소에서 자세히 설명합니다:
+        // https://martin.ankerl.com/2009/12/09/how-to-create-random-colors-programmatically/
+        URPMaterialPropertyBaseColor RandomColor()
+        {
+            // Note: 이 개념에 익숙하지 않은 경우, 이것은 "로컬 함수"입니다.
+            // 더 많은 정보를 얻기 위해 인터넷에서 그 용어를 검색할 수 있습니다.

+            // 0.618034005f == 2 / (math.sqrt(5) + 1) == 황금비율의 반대
+            hue = (hue + 0.618034005f) % 1;
+            var color = UnityEngine.Color.HSVToRGB(hue, 1.0f, 1.0f);
+            return new URPMaterialPropertyBaseColor { Value = (UnityEngine.Vector4)color };
+        }

         var ecbSingleton = SystemAPI.GetSingleton<BeginSimulationEntityCommandBufferSystem.Singleton>();
         var ecb = ecbSingleton.CreateCommandBuffer(state.WorldUnmanaged);

         var vehicles = CollectionHelper.CreateNativeArray<Entity>(config.TankCount, Allocator.Temp);
         ecb.Instantiate(config.TankPrefab, vehicles);

+        // EntityQueryMask는 EntityQuery에 의해 특정 엔티티가 선택 되었는지 여부를 효율적인 테스트를 제공합니다.
+        var queryMask = m_BaseColorQuery.GetEntityQueryMask();

+        foreach (var vehicle in vehicles)
+        {
+            // 모든 프리팹의 근본에는 해당 엔티티의 모든 목록인 LinkedEntityGroup이 포함됩니다.
+            ecb.SetComponentForLinkedEntityGroup(vehicle, queryMask, RandomColor());
+        }

         state.Enabled = false;
     }
 }
플레이 모드로 들어가면 탱크들이 무작위 색상으로 지정됩니다.
플레이 모드에서 나가세요.
"Scripts/Authoring" 폴더에 있는 "CannonBallAuthoring.cs" 파일의 내용을 다음과 같이 수정합니다:
 using Unity.Entities;
 using Unity.Rendering;

 class CannonBallAuthoring : UnityEngine.MonoBehaviour
 {
 }

 class CannonBallBaker : Baker<CannonBallAuthoring>
 {
     public override void Bake(CannonBallAuthoring authoring)
     {
         AddComponent<CannonBall>();
+        AddComponent<URPMaterialPropertyBaseColor>();
     }
 }
다음과 같이 "Scripts/Aspects" 폴더에 있는 "TurretAspect.cs" 파일의 내용을 수정합니다:
 using Unity.Entities;
 using Unity.Mathematics;
 using Unity.Rendering;

 readonly partial struct TurretAspect : IAspect
 {
     readonly RefRO<Turret> m_Turret;
+    readonly RefRO<URPMaterialPropertyBaseColor> m_BaseColor;

     public Entity CannonBallSpawn => m_Turret.ValueRO.CannonBallSpawn;
     public Entity CannonBallPrefab => m_Turret.ValueRO.CannonBallPrefab;
+    public float4 Color => m_BaseColor.ValueRO.Value;
 }
다음과 같이 "Scripts/Systems" 폴더에 있는 "TurretShootingSystem.cs" 파일의 내용을 수정합니다:
 [BurstCompile]
 partial struct TurretShoot : IJobEntity
 {
     [ReadOnly] public ComponentLookup<LocalToWorldTransform> LocalToWorldTransformFromEntity;
     public EntityCommandBuffer ECB;

     void Execute(in TurretAspect turret)
     {
         var instance = ECB.Instantiate(turret.CannonBallPrefab);
         var spawnLocalToWorld = LocalToWorldTransformFromEntity[turret.CannonBallSpawn];
         var cannonBallTransform = UniformScaleTransform.FromPosition(spawnLocalToWorld.Value.Position);

         cannonBallTransform.Scale = LocalToWorldTransformFromEntity[turret.CannonBallPrefab].Value.Scale;
         ECB.SetComponent(instance, new LocalToWorldTransform
         {
             Value = cannonBallTransform
         });
         ECB.SetComponent(instance, new CannonBall
         {
             Speed = spawnLocalToWorld.Value.Forward() * 20.0f
         });

+        // 아래의 줄은 포탑에서 대포알까지 색을 전파합니다.
+        ECB.SetComponent(instance, new URPMaterialPropertyBaseColor { Value = turret.Color });
     }
 }
"SafeZone Radius"는 아직 사용되지 않지만 이후 진행될 튜토리얼과 관련이 있습니다.
"Scripts/Systems" 폴더에 "TankSpawningSystem.cs"이라는 이름의 새 C# 스크립트 파일을 만들고 다음 내용을 저장합니다. ⚠ WARNING
이 시점에서 플레이 모드로 들어가면 탱크가 하나밖에 없다는 사실에 놀랄 수 있습니다. 실제로 20개의 탱크가 있지만, 그들은 모두 같은 위치에서 스폰되고 정확히 같은 방식으로 움직입니다.
using Unity.Burst;
using Unity.Collections;
using Unity.Entities;
using Unity.Mathematics;
using Unity.Rendering;

[BurstCompile]
partial struct TankSpawningSystem : ISystem
{
    [BurstCompile]
    public void OnCreate(ref SystemState state)
    {
    }

    [BurstCompile]
    public void OnDestroy(ref SystemState state)
    {
    }

    [BurstCompile]
    public void OnUpdate(ref SystemState state)
    {
        var config = SystemAPI.GetSingleton<Config>();

        var ecbSingleton = SystemAPI.GetSingleton<BeginSimulationEntityCommandBufferSystem.Singleton>();
        var ecb = ecbSingleton.CreateCommandBuffer(state.WorldUnmanaged);

        var vehicles = CollectionHelper.CreateNativeArray<Entity>(config.TankCount, Allocator.Temp);
        ecb.Instantiate(config.TankPrefab, vehicles);

        // 이 시스템은 시작할 때 한 번만 실행해야 합니다. 따라서 한 번 업데이트하면 자동으로 비활성화됩니다.
        state.Enabled = false;
    }
}
다음과 같이 "Scripts/Systems" 폴더에 있는 "TankMovementSystem.cs" 파일의 내용을 수정합니다:
 using Unity.Entities;
 using Unity.Mathematics;
 using Unity.Transforms;

 partial class TankMovementSystem : SystemBase
 {
     protected override void OnUpdate()
     {
         var dt = SystemAPI.Time.DeltaTime;

         Entities
             .WithAll<Tank>()
-            .ForEach((TransformAspect transform) =>
+            .ForEach((Entity entity, TransformAspect transform) =>
             {
                 var pos = transform.Position;

+                // 이는 탱크의 실제 위치를 수정하는 것이 아니라 3D 노이즈 기능을 샘플링하는 지점만 수정합니다.
+                // 이 방식으로, 모든 탱크는 다른 파츠를 사용하고 있으며 고유한 랜덤 플로우 필드를 따라 이동합니다.
+                pos.y = entity.Index;
                 var angle = (0.5f + noise.cnoise(pos / 10f)) * 4.0f * math.PI;

                 var dir = float3.zero;
                 math.sincos(angle, out dir.x, out dir.z);
                 transform.Position += dir * dt * 5.0f;
                 transform.Rotation = quaternion.RotateY(angle);

             }).ScheduleParallel();
     }
 }
"Scripts/Aspects" 폴더에 "CannonBallAspect.cs"이라는 이름의 새 C# 소스 파일을 만들고 다음 내용을 저장합니다.
using Unity.Entities;
using Unity.Mathematics;
using Unity.Transforms;

readonly partial struct CannonBallAspect : IAspect
{
    // 외관(aspect)의 엔티티 필드는 엔티티 자체에 대한 액세스를 제공합니다.
    // 이것은 예를 들어 EntityCommandBuffer에 명령을 등록하는 데 필요합니다.
    public readonly Entity Self;

    // 외관(aspect)들은 다른 외관(aspect)을 격납할 수 있습니다.
    readonly TransformAspect Transform;

    // RefRW 필드는 컴퍼넌트에 대한 읽기 쓰기 액세스 권한을 제공합니다.
    // 외관(aspect)이 "in" 매개 변수로 사용되는 경우 필드는 RefRO인 것처럼 동작하며 쓰기 시도 시 예외를 발생시킵니다.
    readonly RefRW<CannonBall> CannonBall;

    // 이와 같은 프로퍼티는 필수가 아니고, 대신 트랜스폼 필드를 공개할 수도 있습니다.
    // 그러나 "aspect.aspect.aspect.component.value.value" 같은 체인을 피함으로써 가독성을 향상시킵니다.
    public float3 Position
    {
        get => Transform.Position;
        set => Transform.Position = value;
    }

    public float3 Speed
    {
        get => CannonBall.ValueRO.Speed;
        set => CannonBall.ValueRW.Speed = value;
    }
}
"Scripts/Systems" 폴더에 "CannonBallSystem.cs"이라는 이름의 새 C# 소스 파일을 만들고 다음 내용을 저장합니다.
using Unity.Burst;
using Unity.Entities;
using Unity.Mathematics;

[BurstCompile]
// IJobEntity는 소스 생성에 의존하여 실행 함수의 서명 시에 암시적으로 쿼리를 정의합니다.
partial struct CannonBallJob : IJobEntity
{
    // 일반 EntityCommandBuffer는 병렬로 사용할 수 없으며, ParallelWriter를 명시적으로 사용해야 합니다.
    public EntityCommandBuffer.ParallelWriter ECB;
    // job에서 직접 시간에 액세스할 수 없으므로 DeltaTime을 매개 변수로 전달해야 합니다.
    public float DeltaTime;

    // ChunkIndexInQuery 특성은 청크 인덱스를 int 매개 변수에 매핑합니다.
    // 각 chunk는 단일 스레드에서만 처리할 수 있으므로 이러한 인덱스는 각 스레드마다 고유합니다.
    // 또한 병렬 처리의 양에 관계없이 완전히 결정론적입니다.
    // 따라서 이러한 인덱스는 EntityCommandBuffer에서 명령을 기록할 때 정렬 키로 사용되므로,
    // 명령 재생이 항상 결정론적임을 보장합니다.
    void Execute([ChunkIndexInQuery] int chunkIndex, ref CannonBallAspect cannonBall)
    {
        var gravity = new float3(0.0f, -9.82f, 0.0f);
        var invertY = new float3(1.0f, -1.0f, 1.0f);

        cannonBall.Position += cannonBall.Speed * DeltaTime;
        if (cannonBall.Position.y < 0.0f)
        {
            cannonBall.Position *= invertY;
            cannonBall.Speed *= invertY * 0.8f;
        }

        cannonBall.Speed += gravity * DeltaTime;

        var speed = math.lengthsq(cannonBall.Speed);
        if (speed < 0.1f) ECB.DestroyEntity(chunkIndex, cannonBall.Self);
    }
}

[BurstCompile]
partial struct CannonBallSystem : ISystem
{
    [BurstCompile]
    public void OnCreate(ref SystemState state)
    {
    }

    [BurstCompile]
    public void OnDestroy(ref SystemState state)
    {
    }

    [BurstCompile]
    public void OnUpdate(ref SystemState state)
    {
        var ecbSingleton = SystemAPI.GetSingleton<EndSimulationEntityCommandBufferSystem.Singleton>();
        var ecb = ecbSingleton.CreateCommandBuffer(state.WorldUnmanaged);
        var cannonBallJob = new CannonBallJob
        {
            // EntityCommandBuffer의 병렬 기록기를 가져오는 데 필요한 함수 호출을 기록합니다.
            ECB = ecb.AsParallelWriter(),
            // job에서 직접 시간에 액세스할 수 없으므로 DeltaTime을 매개 변수로 전달해야 합니다.
            DeltaTime = SystemAPI.Time.DeltaTime
        };
        cannonBallJob.ScheduleParallel();
    }
}
"Scripts/Components" 폴더에 "CannonBall.cs"이라는 이름의 새 C# 소스 파일을 만들고 다음 내용을 저장합니다.
using Unity.Entities;
using Unity.Mathematics;

// 대포알에 대한 동일한 접근 방식으로, 우리는 엔티티를 식별하기 위한 구성요소를 만들고 있습니다.
// 그러나 이번에는 속도 필드라는 데이터가 포함되어 있기 때문에 태그 컴퍼넌트(비어 있는 컴퍼넌트)가 아닙니다.
// 그것은 즉시 사용되지는 않겠지만, 우리가 모션을 구현할 때 관련성이 있을 것입니다.
struct CannonBall : IComponentData
{
    public float3 Speed;
}
"Scripts/Authoring" 폴더에 "CannonBallAuthoring.cs"이라는 이름의 새 C# 소스 파일을 만들고 다음 내용을 저장합니다.
using Unity.Entities;
using Unity.Rendering;

class CannonBallAuthoring : UnityEngine.MonoBehaviour
{
}

class CannonBallBaker : Baker<CannonBallAuthoring>
{
    public override void Bake(CannonBallAuthoring authoring)
    {
		// 기본적으로 컴퍼넌트들은 0으로 초기화됩니다.
        // 따라서 이 경우 대포알의 스피드 필드는 float3.zero가 됩니다.
        AddComponent<CannonBall>();
    }
}
Hierarchy 창에서 "SampleScene"을 마우스 오른쪽 버튼으로 클릭하고 GameObject > 3D Object > Sphere를 선택한 후 새로운 GameObject의 이름을 "CannonBall"로 지정합니다. Position을 (0,0,0), Rotation을 (0,0,0), Scale을 (0.2,0.2,0.2)로 설정합니다.
"Scripts/Aspects" 폴더에 "TurretAspect.cs"이라는 이름의 새 C# 소스 파일을 만들고 다음 내용을 저장합니다.
using Unity.Entities;
using Unity.Mathematics;
using Unity.Rendering;

// Turret component에 직접 접근하는 것이 아니라 외관(Aspect)을 만들고 있습니다.
// 외관(Aspect)을 사용하면 구성 요소에 액세스하기 위한 사용자 지정 API를 제공할 수 있습니다.
readonly partial struct TurretAspect : IAspect
{
    // 이 참조는 Turret 구성 요소에 대한 읽기 전용 액세스를 제공합니다.
    // 읽기 전용 참조에서 ValueRW(ValueRO 대신)를 사용하려고 하면 오류가 발생합니다.
    readonly RefRO<Turret> m_Turret;

    // 다음 속성들의 ValueRo값의 사용에 유의하십시오.
    public Entity CannonBallSpawn => m_Turret.ValueRO.CannonBallSpawn;
    public Entity CannonBallPrefab => m_Turret.ValueRO.CannonBallPrefab;
}
📝 NOTE
다음 단계에서는 타입이 지정된 구성 요소에 임의로 접근할 수 있는 ComponentDataFromEntity<T>를 사용합니다. 이 기능에 대한 자세한 내용은 API Documentation를 참조하십시오.
"Scripts/Systems" 폴더에 "TurretShootingSystem.cs"이라는 이름의 새 C# 소스 파일을 만들고 다음 내용을 저장합니다.
using Unity.Burst;
using Unity.Collections;
using Unity.Entities;
using Unity.Rendering;
using Unity.Transforms;

[BurstCompile]
partial struct TurretShootingSystem : ISystem
{
    // ComponentLookup은 컴퍼넌트(엔티티 검색)에 대한 임의 접근을 제공합니다.
    // 우리는 이것을 사용하여 스폰 포인트(대포 노즐)의 월드 공간 좌표와 방향을 추출할 것입니다.
    ComponentLookup<LocalToWorldTransform> m_LocalToWorldTransformFromEntity;

    [BurstCompile]
    public void OnCreate(ref SystemState state)
    {
        // ComponentLookup 구조체는 한 번 초기화해야 합니다.
        // 매개 변수는 검색들을 읽기 전용으로 할지 또는 쓰기를 허용할지 여부를 지정합니다.
        m_LocalToWorldTransformFromEntity = state.GetComponentLookup<LocalToWorldTransform>(true);
    }

    [BurstCompile]
    public void OnDestroy(ref SystemState state)
    {
    }

    [BurstCompile]
    public void OnUpdate(ref SystemState state)
    {
        // ComponentLookup 구조체들은 모든 프레임마다 업데이트 되어야 합니다.
        m_LocalToWorldTransformFromEntity.Update(ref state);

        // 인스턴스화에 필요한 구조 변경을 지연시키기 위해 EntityCommandBuffer를 제작합니다.
        var ecbSingleton = SystemAPI.GetSingleton<BeginSimulationEntityCommandBufferSystem.Singleton>();
        var ecb = ecbSingleton.CreateCommandBuffer(state.WorldUnmanaged);

        // Job의 인스턴스를 만드는 중입니다.
        // 그것을 통과하면서 ComponentLookup은 스폰 포인트의 월드 트랜스폼을 요구합니다.
        // 또한 Job이 쓸 수 있는 엔티티 명령 버퍼도 있습니다.
        var turretShootJob = new TurretShoot
        {
            LocalToWorldTransformFromEntity = m_LocalToWorldTransformFromEntity,
            ECB = ecb
        };

        // 싱글 스레드에서 실행을 예약하고 메인 스레드를 차단하지 않습니다.
        turretShootJob.Schedule();
    }
}

[BurstCompile]
partial struct TurretShoot : IJobEntity
{
    [ReadOnly] public ComponentLookup<LocalToWorldTransform> LocalToWorldTransformFromEntity;
    public EntityCommandBuffer ECB;

    // TurretAspects 매개변수는 읽기 전용으로 선언하는 "in"입니다.
    // 이 경우 "ref"(읽기-쓰기)로 만들면 차이가 없지만
	// 잠재적으로 경합 상태(Race conditions)가 안전 시스템(Safety System)을 건드는 상황에 직면하게 됩니다.
    // 그래서 일반적으로 가능한 모든 곳에서 "in"을 사용하는 것이 좋은 원칙입니다.
    void Execute(in TurretAspect turret)
    {
        var instance = ECB.Instantiate(turret.CannonBallPrefab);
        var spawnLocalToWorld = LocalToWorldTransformFromEntity[turret.CannonBallSpawn];
        var cannonBallTransform = UniformScaleTransform.FromPosition(spawnLocalToWorld.Value.Position);

        // 새 인스턴스의 트랜스폼을 덮어쓰려고 합니다.
		// 비율을 명시적으로 복사하지 않으면 1로 재설정되고 크기가 너무 큰 캐논 볼을 갖게 됩니다.
        cannonBallTransform.Scale = LocalToWorldTransformFromEntity[turret.CannonBallPrefab].Value.Scale;
        ECB.SetComponent(instance, new LocalToWorldTransform
        {
            Value = cannonBallTransform
        });
        ECB.SetComponent(instance, new CannonBall
        {
            Speed = spawnLocalToWorld.Value.Forward() * 20.0f
        });
    }
}
"Scripts/Components" 폴더에 "Tank.cs"이라는 이름의 새 C# 소스 파일을 만들고 다음 내용을 저장합니다:
using Unity.Entities;

// Turret에서 했던 것처럼 Tag component를 생성하여 Tank(큐브)를 식별합니다.
struct Tank : IComponentData
{
}
"Scripts/Authoring" 폴더에 "TankAuthoring.cs"이라는 이름의 새 C# 소스 파일을 만들고 다음 내용을 저장합니다.
using Unity.Entities;

class TankAuthoring : UnityEngine.MonoBehaviour
{
}

class TankBaker : Baker<TankAuthoring>
{
    public override void Bake(TankAuthoring authoring)
    {
        AddComponent<Tank>();
    }
}
"TankAuthoring" 컴퍼넌트를 "Tank" GameObject에 추가합니다.
"Scripts/Systems" 폴더에 "TankMovementSystem.cs"이라는 이름의 새 C# 소스 파일을 만들고 다음 내용을 저장합니다.
using Unity.Entities;
using Unity.Mathematics;
using Unity.Transforms;

// ISystem과 달리 SystemBase 시스템은 클래스입니다.
// Burst 컴파일되지 않으며 관리되는 코드(Managed Code)를 사용할 수 있습니다.
partial class TankMovementSystem : SystemBase
{
    protected override void OnUpdate()
    {
        // Entities.ForEach 아래는 각 항목에 대해 (암시적으로) Burst 컴파일됩니다.
        // 그리고 시간은 관리되는 유형(클래스)인 SystemBase의 멤버입니다.
        // 이것은 그곳에서 직접 시간에 접근하는 것이 불가능하다는 것을 의미한다.
        // 따라서 필요한 값(DeltaTime)을 로컬 변수에 복사해야 합니다.
        var dt = SystemAPI.Time.DeltaTime;

        // Entities.ForEach는 쿼리를 처리하는 오래된 접근 방식입니다.
		// 이 사용은 권장되지 않지만, 우리가 IFE와 동등한 기능을 얻을 때까지는 편리한 방법입니다.
        Entities
            .WithAll<Tank>()
            .ForEach((TransformAspect transform) =>
            {
                // 이 값은 ForEach에 매개 변수로 전달되는 람다식입니다.
                var pos = transform.Position;

                // Unity.Mathematics.noise는 여러 유형의 노이즈 함수들을 제공합니다.
                // 여기서는 고전적인 펄린 소음(cnoise)을 사용합니다.
                // Perlin 노이즈에서 흐름장을 생성하는 방법에 관한 상세 내용은 여기에 있습니다:
                // // https://www.bit-101.com/blog/2021/07/mapping-perlin-noise-to-angles/
                var angle = (0.5f + noise.cnoise(pos / 10f)) * 4.0f * math.PI;

                var dir = float3.zero;
                math.sincos(angle, out dir.x, out dir.z);
                transform.Position += dir * dt * 5.0f;
                transform.Rotation = quaternion.RotateY(angle);

                // Entities.ForEach 시퀀스의 마지막 함수 호출은 코드가 실행되는 방법을 제어합니다.
			// Run (main thread), Schedule (single thread, async) 또는  ScheduleParallel (multiple threads, async).
            // Entities.ForEach는 기본적으로 job 발생기이며, 병렬 jobs를 매우 쉽게 만들 수 있습니다.
			// 이는 불행히도 복잡성 비용과 이상한 임의적 제약 조건이 수반되며, 이는 보다 명시적인 접근 방식이 선호되는 이유이다.
			// 이러한 명시적 접근법(IJobEntity)은 이 튜토리얼의 뒷부분에서 다룹니다.
            }).ScheduleParallel();
    }
}
"Scripts/Systems" 폴더에 "TurretRotationSystem.cs"이라는 새 파일을 만들고 다음 내용을 넣습니다.
using Unity.Burst;
using Unity.Entities;
using Unity.Mathematics;
using Unity.Transforms;

// Unmanaged systems based on ISystem can be Burst compiled, but this is not yet the default.
// So we have to explicitly opt into Burst compilation with the [BurstCompile] attribute.
// It has to be added on BOTH the struct AND the OnCreate/OnDestroy/OnUpdate functions to be
// effective.
[BurstCompile]
partial struct TurretRotationSystem : ISystem
{
    // Every function defined by ISystem has to be implemented even if empty.
    [BurstCompile]
    public void OnCreate(ref SystemState state)
    {
    }

    // Every function defined by ISystem has to be implemented even if empty.
    [BurstCompile]
    public void OnDestroy(ref SystemState state)
    {
    }

    // See note above regarding the [BurstCompile] attribute.
    [BurstCompile]
    public void OnUpdate(ref SystemState state)
    {
        // The amount of rotation around Y required to do 360 degrees in 2 seconds.
        var rotation = quaternion.RotateY(SystemAPI.Time.DeltaTime * math.PI);

        // The classic C# foreach is what we often refer to as "Idiomatic foreach" (IFE).
        // Aspects provide a higher level interface than directly accessing component data.
        // Using IFE with aspects is a powerful and expressive way of writing main thread code.
        foreach (var transform in SystemAPI.Query<TransformAspect>())
        {
            transform.RotateWorld(rotation);
        }
    }
}
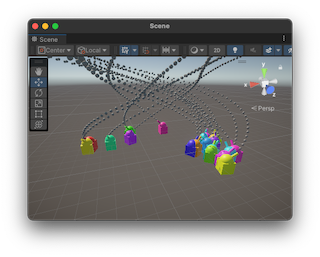
플레이 모드로 들어가면 모든 것이 재미있게 회전하고 있음을 알 수 있습니다(대포(Cannon)가 다른 것들로부터 점진적으로 분리되어 있으며, 아래 애니메이션은 그것을 잠시 실행시킨 후의 상황을 보여줍니다)
문제는 우리가 만든 foreach가 각각의 transform이 있는 것과 매칭된다는 것입니다. 이것은 탱크 계층의 모든 부분을 회전시킵니다. 포탑의 회전에만 영향을 미치도록 제한해야 합니다.
플레이 모드에서 나가세요.
"Scripts/Components" 폴더에 "Turret.cs"이라는 이름의 새 C# 소스 파일을 만들고 다음 내용을 저장합니다.
using Unity.Entities;

// 빈 구성 요소를 "tag component"라고 합니다.
struct Turret : IComponentData
{
}
"Scripts/Authoring" 폴더에 "TurretAuthoring.cs"이라는 이름의 새 C# 소스 파일을 만들고 다음 내용을 저장합니다.
using Unity.Entities;

// MonoBehavior 작성은 일반적인 GameObject 컴퍼넌트입니다.
// 그것들은 ECS 데이터를 생성하는 Baking 시스템의 입력을 구성합니다.
class TurretAuthoring : UnityEngine.MonoBehaviour
{
}

// Baker는 MonoBehaviours를 작성을 엔티티와 컴퍼넌트로 변환합니다.
class TurretBaker : Baker<TurretAuthoring>
{
    public override void Bake(TurretAuthoring authoring)
    {
        AddComponent<Turret>();
    }
}
TurretAuthoring.cs 파일을 Turret Game Object에 끌어다 놓거나 Game Object 검사기의 Add Component 버튼을 사용하여 "TurretAuthoring" 컴퍼넌트를 "Turret" GameObject에 추가합니다.
"Turret" GameObject가 선택되어 있는 동안 "Entity Conversion" 패널에서 "Turret" 컴퍼넌트가 엔티티에 있는지 확인합니다(위로 끌어 확장해야 할 수도 있습니다).
다음과 같이 "Scripts/Systems" 폴더에 있는 "TurretRotationSystem.cs" 파일의 내용을 수정합니다.
 using Unity.Burst;
 using Unity.Entities;
 using Unity.Mathematics;
 using Unity.Transforms;

 [BurstCompile]
 partial struct TurretRotationSystem : ISystem
 {
     [BurstCompile]
     public void OnCreate(ref SystemState state)
     {
     }

     [BurstCompile]
     public void OnDestroy(ref SystemState state)
     {
     }

     [BurstCompile]
     public void OnUpdate(ref SystemState state)
     {
         var rotation = quaternion.RotateY(SystemAPI.Time.DeltaTime * math.PI);

+        // WithAll adds a constraint to the query, specifying that every entity should have such component.
+        foreach (var transform in SystemAPI.Query<TransformAspect>().WithAll<Turret>())
-        foreach (var transform in SystemAPI.Query<TransformAspect>())
         {
             transform.RotateWorld(rotation);
         }
     }
 }
Scenes 폴더의 SampleScene이 현재 열려 있는지 확인합니다. 다음 단계는 파일로 저장된 씬(Scene)에서만 작동합니다.
Hierarchy 창에서 마우스 오른쪽 버튼을 클릭하고 New Subscene > Empty Scene...을 선택합니다. 새 씬(Scene)의 이름을 "EntityScene"으로 지정하고 Scenes/SampleScene에 배치합니다.
Hierarchy 창에서 "EntityScene"을 마우스 오른쪽 버튼으로 클릭하고 GameObject > 3D Object > Cube를 선택한 후 새로운 GameObject의 이름을 "Tank"로 지정합니다. Position을 (0,0,0), Rotation을 (0,0,0), Scale을 (1,1,1)로 설정합니다.
Hierarchy 창에서 "Tank"를 마우스 오른쪽 단추로 클릭하고 3D Object > Sphere를 선택한 후 새 게임 개체의 이름을 "Turret"으로 지정합니다. Position을 (0,0.5,0), Rotation을 (45,0,0), Scale을 (1,1,1)로 설정합니다.
Hierarchy창에서 "Turret"을 마우스 오른쪽 단추로 클릭하고 3D Object > Cylinder를 선택한 후 새 게임 개체의 이름을 "Cannon"으로 지정합니다. Position을 (0,0.5,0), Rotation을 (0,0,0), Scale을 (0.2,0.5,0.2)로 설정합니다.
Hierarchy창에서 "Cannon"을 마우스 오른쪽 단추로 클릭하고 "Create Empty"를 선택한 후 새 게임 개체의 이름을 "SpawnPoint"로 지정합니다. Position을 (0,1,0), Rotation을 (-90,0,0), Scale을 (1,1,1)로 설정합니다.
이제 다음 스크린샷과 유사한 내용이 표시되어야 합니다.
그 작은 탱크에 대한 마지막 한 가지는 각각의 도형들이 기본적으로 컬라이더를 가지고 있다는 것입니다. 우리는 이러한 컬라이더를 사용하지 않을 것이며, 프로젝트에 DOTS 호환 물리 엔진이 없기 때문에 어쨌든(엔티티로 변환) Baking 중에 폐기됩니다. 그러나 DOD의 정신으로, 쓸모없는 데이터를 제거합시다: "Tank"에서 박스 컬라이더 구성 요소를 제거하고, "Turret"에서 스피어 컬라이더 구성 요소를 제거하고, "Cannon"에서 캡슐 컬라이더를 제거합니다. "Spawn Point"에는 컬라이더가 없으므로 거기서는 할 일이 없습니다.
이 튜토리얼에서는 모든 클래스(class)와 구조체(struct)를 내부로 만드는 관례를 따릅니다. 내부 타입 또는 멤버 변수들은 동일한 어셈블리의 파일 내에서만 액세스할 수 있으며, 이는 C#의 기본 접근성 수준입니다. 여러 어셈블리에 걸쳐 분할된 대규모 프로젝트에서 작업할 때는 명시적인 접근성 수정자가 필요합니다. 이에 대해 논의하는 것은 이 튜토리얼의 범위를 벗어나며, 어떤 식으로든 DOTS에만 국한되지 않습니다.